Monday, March 1, 2021

Project 3: Colorized Black and White

Colorized Black and White Photographs

For this assignment, you will be creating 15 colorized black and white photographs.  Each of these fifteen photographs should demonstrate understanding of the following color schemes:

  • Complementary Colors (3 pictures for each complementary pair – 9 total)
  • Analogous colors (3 pictures)
  • Monochromatic colors (3 pictures)


Definitions

Complementary Colors – Colors opposite of each other on the color wheel

  • Red and Green
  • Orange and Blue
  • Yellow and Purple

Analogous colors – 3 or more colors that are next to each other on the color wheel, for example: Red-Violet, Red, Red Orange, and Orange, or Yellow-Green, Green, Blue-Green, Blue, and Blue violet

Monochromatic colors – 3 or more values of the same hue

Hue – What people typically think of as “color” – red, orange, yellow, green, blue, and violet, or anything in between

Value – The darkness or lightness of hues
________________________________________________________________

Colorized Black and White Editing Tips:
  • Make sure that you are on your black and white layer when trying to colorize - if you are on the background layer, you may be accidentally deleting your image
  • Make sure that you have WHITE as your FOREGROUND color and BLACK as your BACKGROUND color.  If you want to erase your colorizing if you messed up, switch to the opposite (black as foreground, white as background).
  • Make sure the opacity of your eraser (on the options bar) is turned all the way up to 100%
  • Make sure the hardness of the edge of your brush is at 100%
  • To zoom in and out - use cmnd+ (zoom in) and cmnd- (zoom out) 
  • To make your brush larger or smaller use [ (smaller) and ] (larger)

Steps for doing colorized black and white photographs:

1. Open your photo. Add a black and white adjustment layer to your photograph

2. Use the eraser tool, use the shortcut "E" or click on this icon:
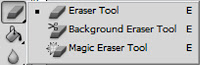
Image result for eraser tool photoshop


3. Make sure you have white as your Foreground color and black as your background color - to switch your foreground and background colors - to switch your foreground and background colors if they are opposite of what you want, like in the images below, click the arched arrow that is to the top right of the color swatches.

4. Make sure you have the black and white adjustment layer selected in your layers window, and begin to erase the areas you want to have color

5. If you accidentally colorize something outside of your subject, you can easily undo this by switching your foreground and background colors to black as the foreground and white as the background, and then erase the colorizing you didn't mean to do (see image above)

Examples:

 Complementary - Orange and Blue

 Complementary - Red and Green

Complementary - Yellow and Purple


Analogous


Monochromatic

Tuesday, February 2, 2021

Classic Themes of Photography Editing Techniques

Dream-Like Image:

  1. Create a copy of your background layer, name it channel mixer
  2. At the bottom of your layers palette, click on the create a new fill/adjustment layer icon, which looks like a half black, half white circle
  3. Click on channel mixer
  4. Click on “Monochrome” in the channel mixer adjustment window (should appear right above your layers palette
  5. Adjust the color meters so that the red and green source channels are adjusted high, and the blue and constant meters are adjusted low, you should have a pretty highly contrasted image, that is a little on the dark side
  6. Merge this layer into the copy of the background layer by right clicking (or pressing “control” awhile clicking) and selecting “merge down”
  7. Add a Gaussian Blur to this layer by clicking on filter > blur > Gaussian blur, and adjust it so that your photograph is a little out of focus, but not so much that you start to lose detail in the photo
  8. Now we are ready to adjust the opacity of this layer, to make it somewhat transparent, bring the opacity (at the top of the layers palette) somewhere between 40%-60%
Example:


Antiqued Image

  1. Create a copy of your background layer, name it Gaussian blur
  2. Add a Gaussian blur to this layer by clicking filter > blur > Gaussian Blur, adjust the blur so that your photograph is a little out of focus, but not so much that you start to lose detail in the photo, click OK
  3. Create a layer mask on this blurred layer by clicking on the icon on the layers palette that looks like a circle inside of a rectangle, you will notice that next to the thumbnail of this layer there is now a white box
  4. Make sure that your background color is white, and your foreground color is black, and select the gradient tool
  5. Make sure that in the tool options you have the “radial gradient” tool selected, this is a circular gradient
  6. Click on your focal point of your photo, and drag so that you create a line from the focal point out, the longer line you drag, the more of your photograph will be in focus
  7. To add a sepia tone to your photograph click layer > new adjustment layer > hue/saturation
  8. Click the option to “colorize” the photograph
  9. Adjust the “hue” meter to somewhere in between orange and yellow, so that your photo has the sepia look
  10. Create a new blank layer, by clicking the create a new layer icon in the layers window
  11. Using the rectangular marquee tool,  select the center of the photograph, leaving a border of about 1”-2” all the way around the edge of the photograph
  12. Click the “q” button on the keyboard to make a quickmask appear, this will turn the border of the photo red
  13. Add another Gaussian blur to this layer, the Gaussian blur should make the photo entirely out of focus this time, you may need to adjust this blur all the way up, click OK
  14. Exit the quick mask mode by pressing “q” on the keyboard again
  15. Select the inverse, so that your border is selected by clicking select > inverse
  16. Using the brush tool, select a very large brush with an extremely soft edge by clicking up top in the tool options bar and bringing the size of the brush up, and the hardness of the brush completely down to zero
  17. Once you have a large, soft edged brush, color in the border of your photograph so that it is darkened
  18. Adjust the opacity of this layer to make a more subtle vignette
Example:


Links for Photoshop Tutorials:


Didn’t find something you liked?  Try doing a google search for “Photoshop Tutorials” or "Photoshop Editing Techniques".  There are literally thousands of youtube videos or step-by-step written tutorials for you to experiment with. 


Past Examples:


Double Exposure Images:

There are many different ways to do a double exposure, essentially, a double exposure is just combining two or more images into one.  Here are a few ideas:

1. Use the quick select tool to select a subject from one picture.  Refine the edge (on the options bar – adjust the radius, feather, and contrast, so you soften the edge, but create enough contrast to make it look realistic when pasted in another image.  Copy (cmnd+c) and paste (cmnd+v) the selected subject into another picture

Example:


2. Layer two pictures on top of one other.  Select an entire image (cmnd+a – select all), copy (cmnd+c), and paste (cmnd+v) over another picture.  Adjust the opacity of the top layer so that It’s somewhat transparent and the other picture shows through


Example: 


3. Layer two pictures on top of one another.  Select the subject in the image on the top layer using the quick select tool.  Refine the edge.  Erase the subject (press delete/backspace on the keyboard) so that the layer behind it shows through.  This makes for a more abstract, surrealist edit.  


Example:


Still Life Example Gallery (Classic Themes of Photography)

Still Life Examples:


Sunday, January 31, 2021

Project 2: Classic Themes of Photography

Requirements
  • For this project you will take 5 Photos for each Classic Theme – 25 photos total
  • You will edit all 25 photos using the techniques listed below - we will be learning these techniques over the next week and a half
The 5 Classic Themes:

1. Portrait
  • Take in Vertical Format
  • Remember to use care in cropping – always crop in between two joints, never at a joint
  • Help your model feel comfortable by taking candid photos or giving them clear direction on how they should be posing – you are the one seeing what the photograph looks like, tell them how they should move to make the best, most flattering portrait


2. Landscape
  • Take in Horizontal Format
  • Remember the rule of thirds – the horizon line should sit on either the thirds or two thirds mark – it depends on what your focal point is.
    • If the subject is the sky (interesting clouds, sunset or sunrise) the sky should take up 2/3rds of the picture
    • If the subject is the landscape, that should take up 2/3rds
  • Avoid overly busy landscapes - if the land has busy texture - consider breaking it up by using close-up foreground objects, or by having the land only take up 1/3 of the photograph


3. Still Life
  • Take in Horizontal Format
  • You arrange objects on table or other flat surface – design your own composition
  • Set up Lighting – either direct light source or diffused lighting work well.  You can use the sun as your light source, just make sure you think about how the light is hitting your subject – pay attention to shadows and highlights
  • We will be going over some lighting techniques - consider using some of these lighting techniques for your still lives


4. Action
  • Take in Vertical or Horizontal Format – It depends on what direction the moving object is going
    • If the object is moving side to side – horizontal format
    • If the object is moving up and down – vertical format
  • Create active space – have a moving object going into the frame


5. Macro
  • Take in vertical or horizontal format
  • Up close picture focusing on textures and surface quality
  • Subject should take up at least 2/3rds of the frame
  • Little to no background noise – try to keep the background as simple as possible – blur it out when necessary
_________________________________________________

Editing: 

1 Dream-Like image for each CTOP*
1 Antiqued image for each CTOP*
1 Black and White image for each CTOP*
1 Double Exposure image for each CTOP*
1 Editing technique of your choice for each CTOP*, I will be posting a list of resources to search for your free choice editing techniques 

For example - you will have 1 portrait edited in the dream-like technique, 1 portrait edited in the antique technique, 1 portrait in B&W, 1 portrait as a double exposure, and 1 portrait edited in a technique of your choice. You will do the same for each of the other CTOPs as well.


*CTOP = Classic Theme of Photography


Tuesday, January 19, 2021

Background Blur Tutorial


Today we will be using the Quick Selection tool and learning all the possibilities of the tool.  We will be learning how to blur a background in a photograph, as well as using the tool to make image adjustments to just a part of our photographs.

Here is a photo you can practice on, or you can use one of your own. If you are using your own photograph, you should choose something with a clearly defined focal point and fairly simple edges for the sake of learning this tool. 


Wednesday, January 13, 2021

Practicing with Photoshop

Today, we will be beginning our work with Adobe Photoshop.  You may use one of the following images to practice adjusting levels and sharpening on Photoshop.  Click on the photo to make it larger, right click (or ctrl+click) on the image, and choose "Save Image As" and save it to your desktop.  Then, we'll drag the photo file into Photoshop and get started!


We will be learning about the interface of the program today.  We will also begin working with Photoshop to sharpen our image, and learn about adjustment layers, particularly levels adjustment layers. Here are some additional resources on these techniques:


Straightening a Horizon 

Tuesday, January 12, 2021

Setting up your blog

Setting up your blog
  • Go to blogger.com
  • Sign in with your google account
  • Create the title of your blog – name it by your full first and last name (how it appears on Illuminate).  For example, my blog would be called Lindsay Behr Photo, and the address would be: Lindsaybehrphoto.blogspot.com. 
  • Post your blog link on google classroom on the assignment for your blog link
  • Keep your login information – write it down and keep it somewhere important.  We will be posting our images on our blogs throughout the
  • Your blog is now set up!  You can click on new post to create a post for your assignment